


HOW TO MAKE A BACKYARD CRICKET PITCH
Spring and summer are the perfect time to get your lawn in top condition! It's also a great time to prepare your very own backyard cricket pitch. In this article, we'll discuss when and how to mow your lawn so that it looks its best. We'll also give some tips on how to keep your grass healthy and lush all season long!
Preparing Your Pitch
Preparing a pitch is best done in spring or summer when your grass is actively growing. It is best to avoid mowing low in winter when the turf is in its dormant period. A pitch is best made on couch varieties, like TifTuf where it can be mown low and will still recover when they are actively growing. Kikuyu and buffalo are also good options. However, on buffalo don’t mow too low as it doesn’t have any rhizomes, which are root-like stems beneath the ground that can produce grass shoots, and growing them back can be a problem.


Choosing Your Location
The ideal location for a pitch is generally in front of the garage, behind a fence or a wall, so you may have an automatic wicketkeeper for one-on-one matches. Keep in mind where four runs or six and out will be and where is it best to bowl from.
Once you’ve picked a spot, mark the length of your pitch. If you have older kids, make the pitch longer as your yard allows. For younger kids, you may want to make your pitch a bit shorter.
Mowing Your Pitch
Now we are on to the next step, mowing your pitch. When mowing your pitch drop the height of your blades on your mower. You need to mow the pitch into the existing lawn nice and short, so you’ll get more bounce. Plus, it will look more like the pitches you see on TV, with a nice contrast to the rest of the yard. Remember though, don’t mow down to dirt or you’ll have a sticky wicket: dead grass!
Depending on how thick your grass is, you may have to mow it a few times to make your wicket. To prevent anything from remaining on the ground after mowing, keep your catcher on when trimming.
Setting up your stumps
Once you’ve removed your clippings, it’s time to set up stumps! If you have wooden stumps and bails, knock ‘em into the ground. If you have metal stumps place them in position.
If you want to get more creative, go for the good old council bin, Esky, stack of buckets, or even tape a set of stumps onto the wall or fence. As a last resort, older kids can use a stack of reclaimed bricks, just be sure not to let any small children behind the wickets.
To make the crease, grab some marking paint and mark the crease at either end. You can make the crease the length of your bat plus its handle.
Aftercare
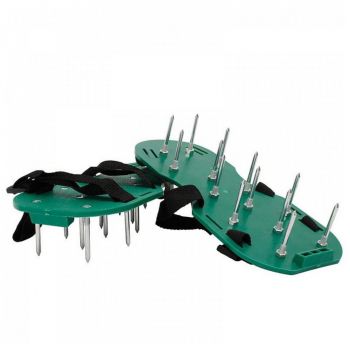
Once you call stumps for the day, give the pitch an aerate and a deep soak. If there’s excessive wear, you may need to lay off it for a few days for it to recover.
Bonus Tip
Wrap some electrical tape around a tennis ball (half of the ball is covered in tape). This will cause the ball to swing a lot in the air and will really keep the batsman guessing!
Happy batting and bowling.